
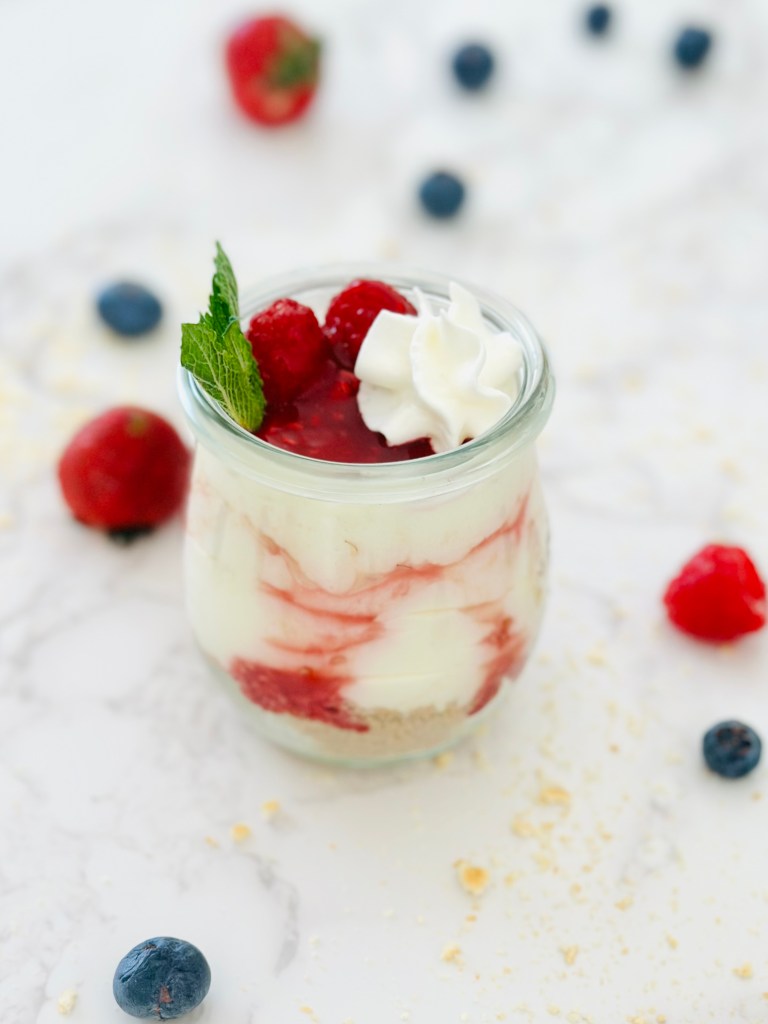
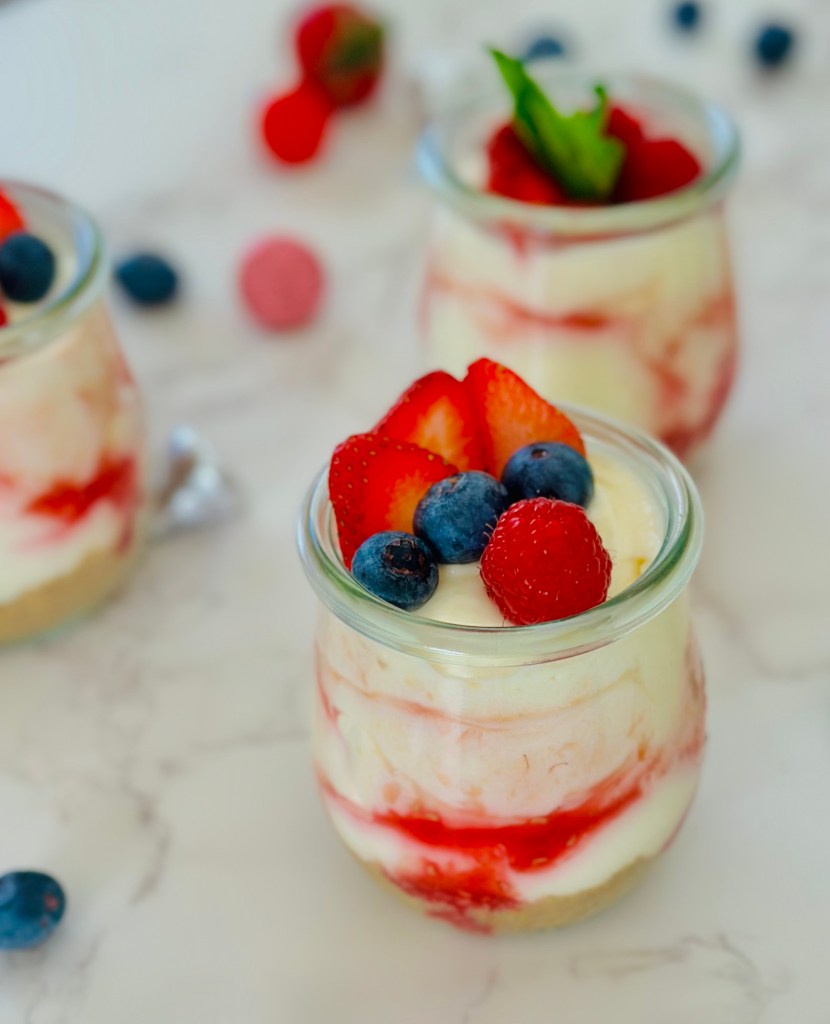
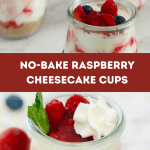
Mini No-Bake Cheesecakes with Homemade Raspberry Sauce
These creamy No-Bake Cheesecake Cups are layered with a buttery graham cracker crust, bright homemade raspberry sauce, and a silky lemon-vanilla filling. And best of all, no oven required! Just assemble, chill, and serve for an easy and decadent dessert that works for dinner parties, brunches, birthdays, or whenever you’re craving something sweet and simple.
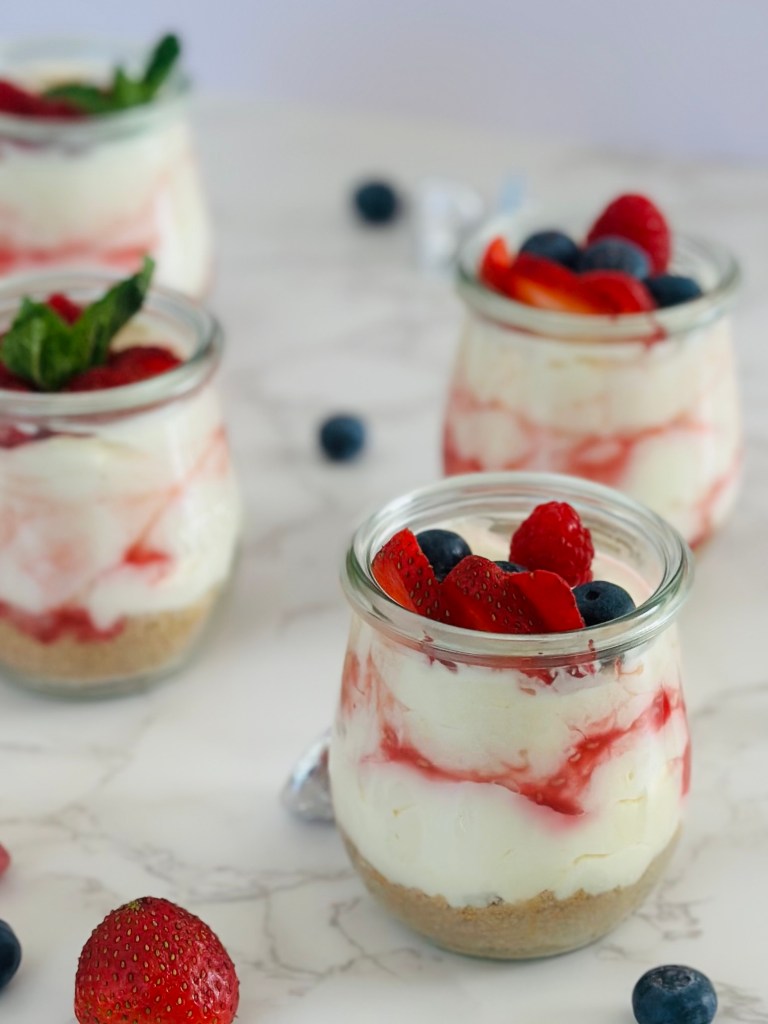
There’s something about a no-bake cheesecake that feels effortlessly special. It looks elegant layered into little jars, with ribbons of bright raspberry sauce swirling through creamy lemon-kissed filling. One of my favorite things about these cheesecakes, besides how decadent and delicious they are, is how they look like it took hours of labor to assemble when, really, it takes just 20 minutes! And you never have to turn on the oven.
I first started making these around Valentine’s Day because the raspberry swirl felt naturally romantic and in keeping with the day. But over time, this dessert has become my go-to for so many other occasions: dinner parties, birthdays, brunch with girlfriends, summer BBQs, you name it. It’s light and indulgent, which means less guilt felt if you end up eating more than one of these (trust me, it’s hard not to). And it might just become your new favorite dessert recipe too!
Why you’ll love these cheesecake cups
- No oven required – Perfect for when you want an impressive dessert without having to turn on the oven and fretting over it cracking while baking.
- Balanced flavor – Creamy, lightly tangy cheesecake meets bright raspberry and buttery graham cracker crust.
- Beautiful presentation – The raspberry swirl that peeks through the cheesecake filling creates a beautiful marbled effect, making it look elevated and elegant.
- Make-ahead friendly – Chill overnight and they’re ready to serve the next day!
- Perfectly portioned – Individual serving cups make it easy to serve and store.
Ingredients needed

- 1 cup raspberries: Provide fresh, vibrant flavor and natural tartness.
- 2 tablespoons granulated sugar: Sweetens the berries and helps draw out their juices.
- Lemon zest (for the sauce and filling): Brightens the sauce and cheesecake filling, helping to enhance the rich flavors.
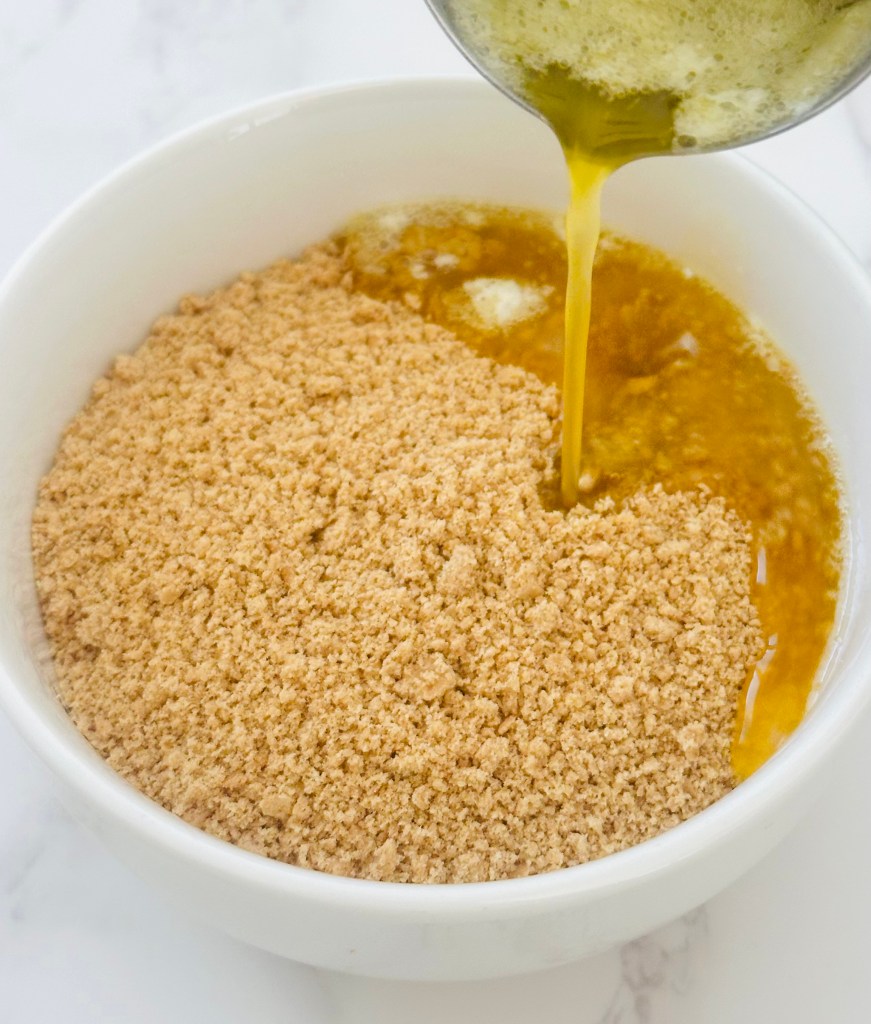
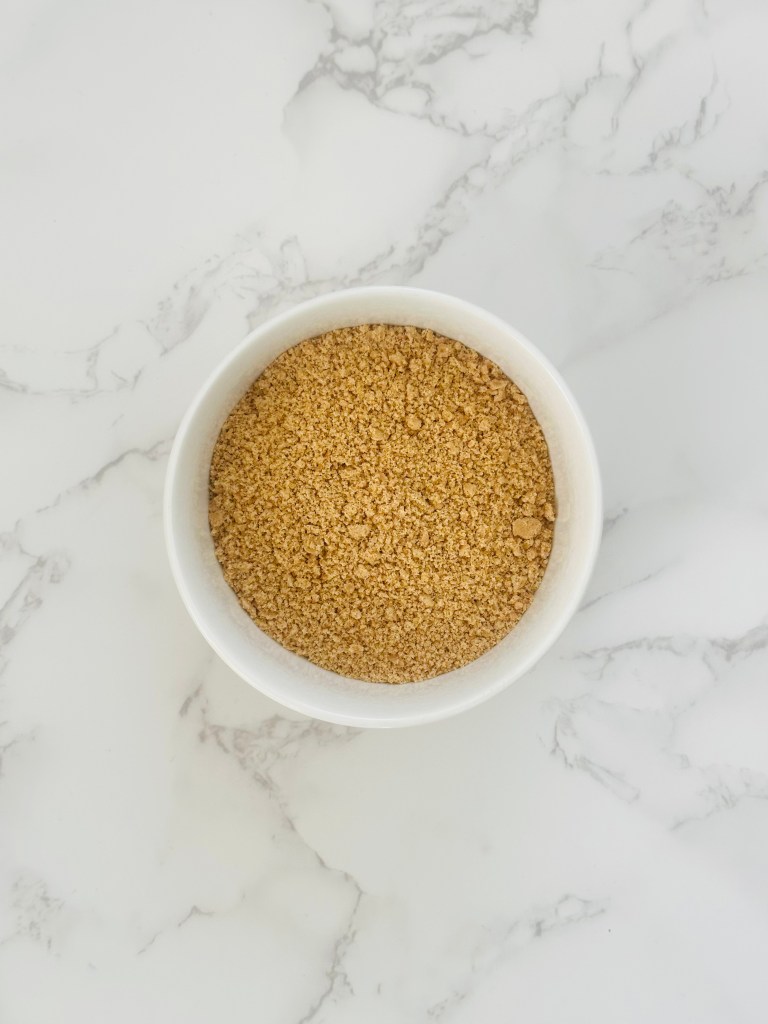
- 1 cup graham cracker crumbs: Will make up the crust for the cheesecakes. For this recipe, you’ll need 1 cup of graham crackers, which is about 8 whole graham cracker sheets, which you’ll pulse in a food processor. But you can also buy them already crushed.
- Unsalted butter: Binds the crumbs together and adds rich flavor.
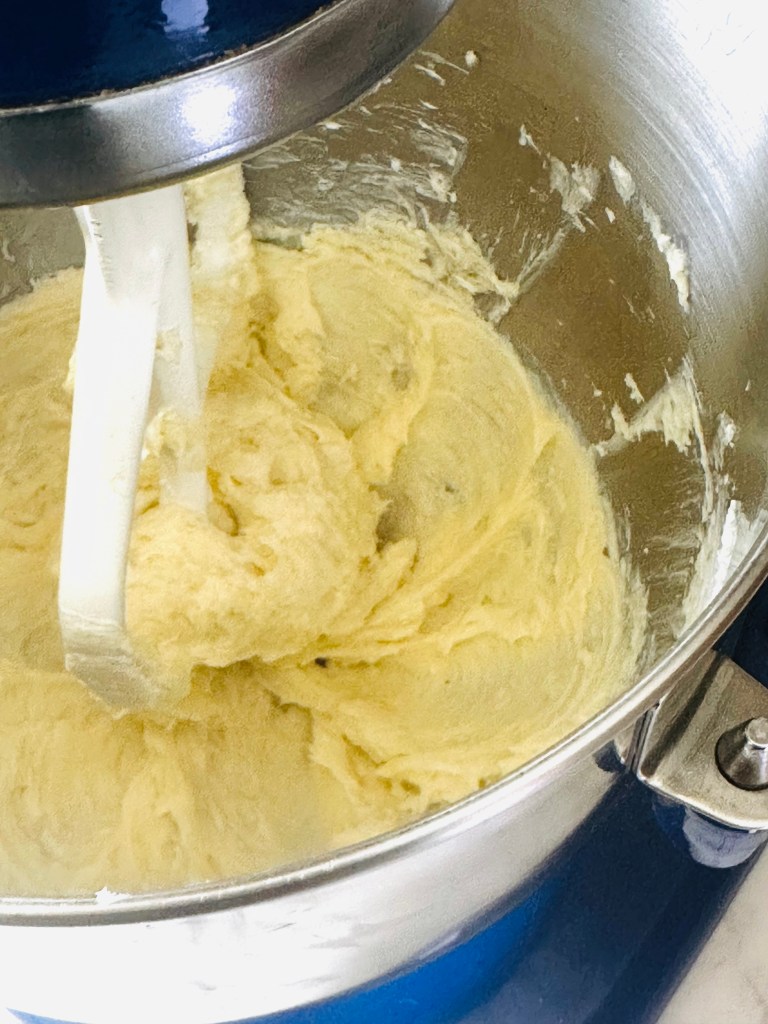
- Softened cream cheese: The creamy foundation of the filling.
- Sugar: Sweetens the filling while keeping the texture smooth.
- Lemon juice: Enhances tanginess for that classic cheesecake flavor.
- Vanilla extract: Adds warmth and depth.
- Pinch of salt: Balances sweetness.
- ¼ cup sour cream or labneh: Adds a subtle tang and extra creaminess to the cheesecake filling.
- Heavy cream: Whipped and folded in to create a light, airy texture that sets beautifully.
How to make no-bake cheesecake cups
Make the Raspberry Sauce
Add raspberries, sugar, and lemon zest to a small saucepan. Cook for 5–7 minutes, stirring gently, until the berries break down and the mixture thickens slightly. Place a strainer over a bowl and strain the sauce. Cool it down to room temperature before chilling in the fridge.
Prepare the Crust
In a food processor with the blade attachment, pulse graham crackers until reduced to fine crumbs. Then transfer to a bowl, add the melted butter, and mix until the crumbs are moistened.

Make the Cheesecake Filling
In a large mixing bowl with the paddle attachment, beat cream cheese, sugar, lemon zest, lemon juice, vanilla extract, and salt until smooth and fluffy. Add the sour cream and mix it in until just combined.
Switch to a whisk attachment, then pour in the heavy cream slowly with the mixer on low speed. Turn up to high and whip until thick and fluffy (about 5 minutes).

Assemble everything
Graham cracker crumbs: Evenly divide among 6 individual serving cups. Use the back of a spoon to press the crumbs firmly in the bottom of each cup.
Raspberry sauce: Slowly drizzle the sauce along the inside edge of the cup while gently rotating the cup in your hand. This lets the sauce form a thin ribbon that wraps around the interior and when the filling goes in, it creates a beautiful red marbling effect.
Cheesecake filling: Carefully spoon the cheesecake filling on top. As the filling settles into the raspberry sauce, you’ll see a beautiful red marbling effect come through. Cover and chill for at least 2 hours, or overnight. Enjoy with some fresh berries and mint leaves on top (whipped cream optional)! You can also dollop extra raspberry drizzle if left over.
Topping ideas for no-bake cheesecake cups
One of my favorite parts about making these little cheesecake cups is how versatile they are when it comes to toppings. I love them as is with raspberries, strawberries, and blueberries, but here are other ways to get creative:
White chocolate shavings
Delicate curls of white chocolate add a subtle sweetness and a soft, elegant look. I love this option when I want the dessert to feel a little more romantic and polished.
Crushed freeze-dried raspberries
These add intense raspberry flavor and a vibrant pink dusting that looks stunning against the creamy white filling. They also give a slight texture contrast without overpowering the dessert.
Peach or nectarine slices
In warmer months, thin slices of ripe peach or nectarine add natural sweetness and a delicate floral note, making these no-bake cheesecake cups perfect for any season!
Fresh blackberries
If you prefer something slightly more dramatic and tart, blackberries are stunning on top. Their darker hue creates a bold contrast and pairs beautifully with the lemon notes in the filling.
Lemon zest
A tiny sprinkle of lemon zest brightens everything up and enhances the subtle citrus notes already in the filling. It’s a small detail that makes the flavor feel balanced and fresh.

Make-ahead tips for no-bake cheesecake cups
These no-bake cheesecake cups are ideal for prepping ahead, making them the perfect no-fail dessert to have on hand when you’re in a pinch.
- Assemble 1 day ahead: Fully assemble and refrigerate the day before. Chilling the cheesecake cups overnight helps the filling firm up and the flavors meld.
- Cover well: Cover tightly with plastic wrap or lids to prevent the filling from drying out.
- Add toppings before serving: Wait to add fresh fruit or garnishes until just before serving for the best texture and presentation.
- Prep components separately: Raspberry sauce can be made 2 days ahead, and the crust can be prepared earlier in the day for easy assembly later.
Tips for the perfect no-bake cheesecake
No-bake cheesecake is simple enough to make, but paying attention to a few key details makes all the difference!
- Make sure that your cream cheese is fully softened but not warm, which will make it easier to mix with the other ingredients.
- Keep the heavy cream really cold, so that it gets nice and fluffy when beaten in the mixer. Leave it in the fridge until right when you’re ready to use it.
- It’s very important to let the raspberry sauce cool completely before layering. This helps prevents the cheesecake from softening too much during assembly and the crust from not breaking apart at the bottom.
- Let the cheesecake cups chill for at least 2 hours before serving. The filling will thicken and firm up the longer it chills. For best results, we recommend making these the night before serving them.
How to store no-bake cheesecake cups
The cheesecakes will keep well, tightly sealed, for up to 3 days refrigerated. We recommend preparing them the night before, lining the cups up on a large baking pan, and covering with plastic wrap before storing in the fridge. We don’t advise freezing the cheesecakes, as the texture ends up becoming too grainy.
Print
Mini No-Bake Cheesecakes with Homemade Raspberry Sauce
- Total Time: 2 hours 20 minutes
- Yield: 4 1x
Description
These creamy No-Bake Cheesecake Cups are layered with a buttery graham cracker crust, bright homemade raspberry sauce, and a silky lemon-vanilla filling. And best of all, no oven required! Just assemble, chill, and serve for an easy and decadent dessert that works for dinner parties, brunches, birthdays, or whenever you’re craving something sweet and simple.
Ingredients
For the raspberry sauce:
- 1 cup raspberries
- 2 tablespoons granulated sugar
- 1/2 teaspoon lemon zest
For the crust:
- 1 cup graham cracker crumbs
- 3 tablespoons unsalted butter, melted
For the cheesecake filling:
- 8oz (225g) cream cheese
- 1/2 cup sugar
- 1 teaspoon lemon zest
- 1 tablespoon lemon juice
- 1 teaspoon vanilla extract
- Pinch of salt
- 1/4 cup sour cream or labneh
- 1 cup heavy cream
- Fresh berries and mint leaves for topping
- Dollop of whipped cream for topping, optional
Instructions
- Make the raspberry sauce: Add the the raspberries, sugar, and lemon zest to a small saucepan over medium heat. Bring the sauce to a gentle simmer, stirring frequently. Then raise the heat to medium-high and continue to cook, while stirring, until thickened and the berries have broken down, 4 to 5 minutes. Place a bowl underneath a mesh strainer and strain the sauce, pressing the mixture down with a spoon to help the liquid come through. (If desired, add a teaspoon of seeds back to the raspberry sauce for texture.) Discard the remaining seeds. Let the sauce come down to room temperature and keep chilled while preparing the rest of the cheesecake.
- Make the crust: Add graham crackers to a food processor fitted with the blade attachment and pulse until the crackers are reduced to fine crumbs. Transfer to a bowl, add the butter, and mix until combined and the crumbs are moistened. Set aside.
- Make the filling: In the bowl of a mixer fitted with the paddle attachment, combine cream cheese, sugar, lemon zest and juice, vanilla extract, and salt. Mix on low speed until combined, then turn the mixer up to medium and beat until smooth and fluffy, about 2 minutes. Periodically stop the mixer to scrape the bottom and sides of the bowl to ensure even mixing. Add the sour cream and mix until just combined.
- Switch to the whisk attachment and, with the mixer on low speed, slowly pour in the cream. Then turn up to high and whip until thick and fluffy, about 5 minutes. Stop the mixer once or twice to scrape the bottom and sides of the bowl.
- Assemble the cups: Put about 2 tablespoons of the graham cracker crumbs in the bottom of your serving cups, pressing firmly into the bottom using the back of a spoon. Slowly drizzle 1 tablespoon of the raspberry sauce, rotating the cup as you pour it in so that the sauce forms a ribbon wrapping around the interior of the cup.
- Evenly spoon about 1/2 cup of filling into each serving cup. Cover and chill in the fridge for at least 2 hours, or overnight, before serving. Garnish with fresh raspberries or strawberries (or other desired fruit) and mint leaves. Top with whipped cream if desired.
Notes
Storage recommendation: The cheesecakes will keep well, tightly sealed, for up to 3 days refrigerated. We recommend preparing them the night before, lining the cups up on a large baking pan, and covering with plastic wrap before storing in the fridge.
- Prep Time: 20
- Cook Time: 2 hours (chilling time)
- Category: Dessert


It looks so delicious, I love it
Thanks for sharing
Thank you for visiting
It so delicious. Great one
Thank you